Follow Me On Social Media!
Dill Pickle Pasta Salad

There’s something magical about bringing together simple ingredients to create a dish that feels both hearty and refreshing, and that’s exactly what this Dill Pickle Pasta Salad delivers! Picture this: the tangy crunch of dill pickles paired with creamy, rich cheeses and vibrant pasta – it’s like a picnic in a bowl! This recipe is a personal favorite of mine, originating from my childhood summers spent with family gatherin’ around the picnic table. It’s quick to make, incredibly satisfying, and a perfect dish for any gathering.
Why you’ll love this recipe
This Dill Pickle Pasta Salad isn’t just a salad; it’s a flavor explosion that dances on your tastebuds! Imagine a creamy, tangy delight that complements any meal, but also stands tall on its own as a picnic star. The combination of cream cheese, dill pickles, and sour cream creates a rich, savory flavor bomb that you’ll crave long after it’s gone.
Not only does it cater to those with a love for pickles, but it’s also a delightful twist on traditional pasta salads that can leave your guests guessing about the secret ingredient. Plus, it packs well for potlucks or family gatherings. You know those hot summer days when you don’t want to turn your kitchen into a sauna? This recipe calls for minimal cooking and can be prepped ahead of time—just chill it and watch the compliments roll in!
Key ingredients overview
Let’s gather our players for this delightful dish:
-
Pasta Noodles: Rotini or shells work best. They capture all the lovely dressing and add just the right heft without becoming a soggy mess.
-
Cream Cheese: The foundation for our creamy sauce. You could even go for flavored varieties if you’re feeling adventurous—garlic and herbs, perhaps?
-
Dill Pickles: The star of the show! Firm, tangy, and wonderfully crunchy; think of them as the zing that makes everything sing.
-
Dill Pickle Juice: Don’t toss that juice! It adds a punch of flavor that really ties everything together.
-
Sour Cream: Adds creaminess and a gentle tang, balancing the richness beautifully.
-
Cheddar Cheese: Shredded and sharp! It gives additional depth and a lovely cheesy bite.
-
Salt & Pepper: Simple seasonings, but integral to bringing all flavors to life.
The cooking process explained
Ready to get this party in your kitchen started? Let’s roll up our sleeves and dive into the steps:
-
Cook the Pasta: Begin by boiling your rotini or shell pasta according to the package instructions until perfectly al dente. Test a piece because no one likes mushy pasta!
-
Drain and Cool: Drain it well, then let it cool completely. Patience is key here; a warm pasta will wilt our beautiful cream cheese.
-
Make the Creamy Mixture: In a large mixing bowl, combine the cream cheese, sour cream, and dill pickle juice. Use a hand mixer or a whisk to blend things until creamy and smooth. This is where the magic begins!
-
Mix it All Together: Toss in the cooled pasta, the chopped dill pickles, and the shredded cheddar cheese. Gorgeous colors and lovely textures—such a feast for the eyes!
-
Seasoning: Don’t skip on seasoning! Add salt and pepper to your liking. Taste, taste, taste!
-
The Big Stir: Mix everything together gently until well-coated. You want all those flavors to get to know each other.
-
Chill Out: Finally, cover your bowl and let it chill in the fridge for at least 30 minutes. This is where the flavors deepen and develop, making your salad all that more irresistible.
Best way to enjoy it
When it’s time to serve, you want to elevate this beauty to its full glory. Consider garnishing with a few extra dill pickle slices or fresh herbs like parsley or chives for brightness. Pair it with grilled chicken, burgers, or just a bowl of fresh fruit for a refreshing summer meal.
For a fun twist, you could serve it as a dip with crackers or veggies on the side. Picture it being the star of your next barbecue—everyone will be coming back for seconds, trust me!
How to store and freeze
Got leftovers? No problem! Store any remaining salad in an airtight container in the fridge. It should stay fresh for about 3-5 days, but let’s be real, it’s usually gone by then! If you plan to freeze, I recommend skipping the pickle addition until you thaw it out for best results. Just mix it in after thawing to maintain that delightful crunch.
Pro chef tips
- Use fresh herbs: If you’re feeling fancy, add in some fresh dill or parsley for a pop of color and flavor.
- Mix up the cheeses: A combination of mozzarella and cheddar can also work wonders if you’re looking for something different.
- And one last thing: Don’t skip chilling it! The flavors have a chance to meld together beautifully during that time in the fridge.
Creative Twists
Want to experiment? Here’s where you can get creative! Try adding in some diced bell peppers for crunch or swapping in some Greek yogurt instead of sour cream for a lighter option. If you’re a fan of spice, diced jalapeños can add a fiery kick that’s simply delightful!
Another fun idea is turning it into a whole meal by adding diced rotisserie chicken or canned tuna. Suddenly, dinner is served!
Ingredients
- Pasta noodles (rotini or shells)
- Cream cheese
- Dill pickles, chopped
- Dill pickle juice
- Sour cream
- Cheddar cheese, shredded
- Salt
- Pepper
Directions to follow
- Cook the pasta per package instructions until al dente.
- Drain and cool the pasta completely.
- In a bowl, mix cream cheese, sour cream, and dill pickle juice until smooth.
- Add cooled pasta, chopped dill pickles, and shredded cheddar cheese to the bowl.
- Season with salt and pepper to taste.
- Stir until everything is mixed and well coated.
- Chill in the fridge for at least 30 minutes before serving.
Your questions answered
- How long does this salad take to prepare? About 15-20 minutes, plus chilling time.
- Can I make it ahead of time? Absolutely! It’s perfect for make-ahead meals.
- What can I serve it with? Pair it with grilled meats, as a side dish for barbecues, or enjoy it on its own.
- Can I use gluten-free pasta? Definitely! Just swap out regular pasta for a gluten-free variety.
- What about dietary adjustments? You can easily make it vegetarian or even vegan by using plant-based cheese and yogurt.
This Dill Pickle Pasta Salad is indeed a delightful mix of flavors and textures that you’ll love serving, sharing, and making again. It brings delight not just to the taste buds but also a sense of satisfaction from creating something so unique and mouthwatering. So get in the kitchen, don your apron, and give it a whirl! You might just find your new favorite dish!
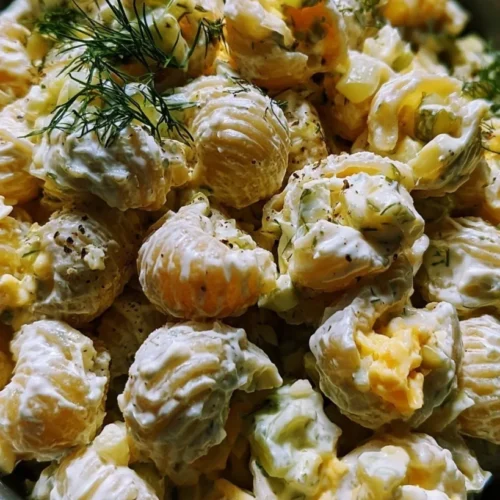
Dill Pickle Pasta Salad
A refreshing and hearty pasta salad featuring creamy ingredients and tangy dill pickles, perfect for gatherings and picnics.
Ingredients
Main Ingredients
- 8 oz Pasta noodles (rotini or shells)
- 8 oz Cream cheese You can use flavored varieties for added taste.
- 1 cup Dill pickles, chopped Firm and crunchy for best results.
- 1/4 cup Dill pickle juice Don't toss the juice; it adds flavor.
- 1/2 cup Sour cream
- 1 cup Cheddar cheese, shredded Sharp cheddar adds depth.
- to taste Salt Essential for balancing flavors.
- to taste Pepper
Instructions
Preparation
- Cook the pasta per package instructions until al dente.
- Drain the pasta and let it cool completely.
- In a bowl, mix cream cheese, sour cream, and dill pickle juice until smooth.
- Add the cooled pasta, chopped dill pickles, and shredded cheddar cheese to the bowl.
- Season with salt and pepper to taste.
- Stir until everything is mixed and well coated.
- Chill in the fridge for at least 30 minutes before serving.
Notes
Consider garnishing with extra dill pickle slices or fresh herbs like parsley or chives. Perfect as a side dish for grilled meats or enjoyed on its own.